This comprehensive guide by Phlebotomy Now School dives deep into the proper technique for applying a tourniquet during blood draws. A tourniquet for blood draw is a crucial tool for phlebotomists, helping to visualize veins for a smooth and successful venipuncture.
| Key Takeaways |
| A properly applied tourniquet for blood draw is essential for successful venipuncture in phlebotomy. |
| The primary function of a tourniquet is to temporarily restrict blood flow, making veins more prominent for easier needle insertion. |
| Two effective methods exist for tying a tourniquet: the “tuck and pull” and the “loop and cinch.” |
| It’s crucial to prioritize patient comfort by avoiding unnecessary tightness and promptly removing the tourniquet after blood collection. |
| Only trained medical professionals should apply tourniquets for severe bleeding control in emergencies. |
Understanding Tourniquets in Phlebotomy
Phlebotomists routinely utilize tourniquets for blood draw procedures. These single-use, latex-free bands are designed to create gentle occlusion of blood flow in the upper arm. This temporary restriction helps veins become more prominent, facilitating easier needle insertion.
When to Use a Tourniquet
The primary purpose of a tourniquet for blood draw is to enhance vein visualization during venipuncture. By gently restricting blood flow, the veins in the cubital fossa (the area just below the elbow) become more engorged and easier to locate. This translates to a smoother blood draw experience for both the patient and the phlebotomist.
Tourniquet Application for Blood Draws
While seemingly simple, proper tourniquet for blood draw application is essential to ensure patient comfort, safety, and successful venipuncture. Here’s a step-by-step guide:
Step 1: Exposing the Arm
- Begin by politely requesting the patient to remove or roll up their long-sleeved clothing, exposing the upper arm from mid-bicep to just above the elbow.
- Kindly ask the patient to remove any jewelry or accessories on the arm, such as watches or bracelets, to ensure a clear working area.
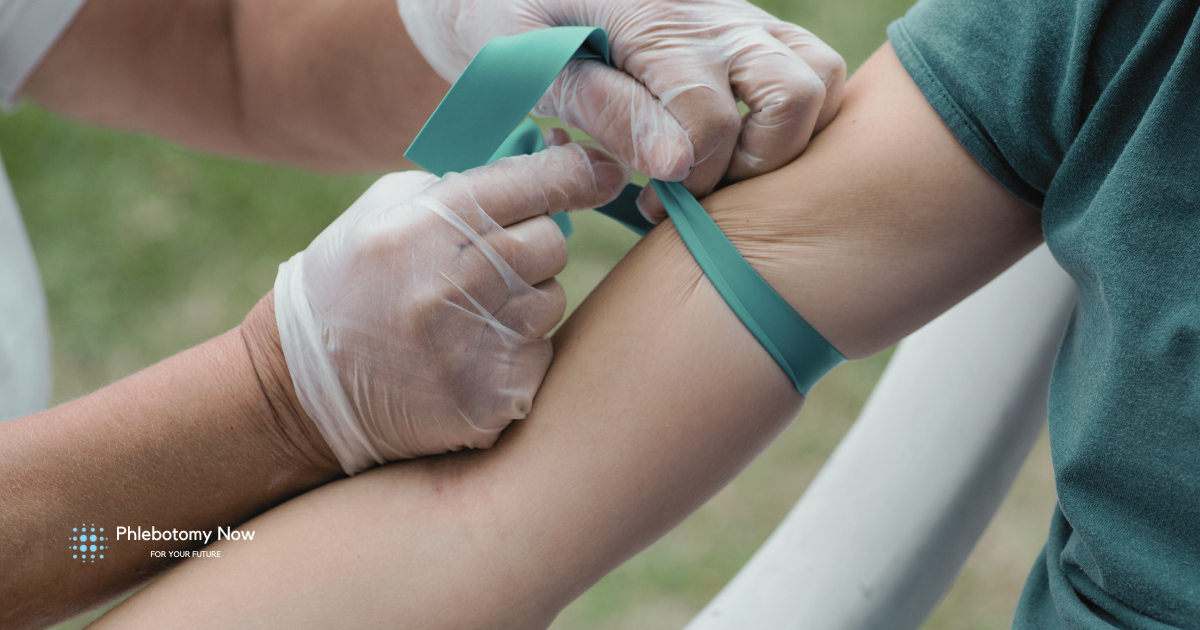
Step 2: Positioning the Tourniquet
- Locate the cubital fossa – the indentation on the underside of the elbow.
- Place the tourniquet approximately four finger-widths above the cubital fossa, ensuring it rests comfortably on the patient’s arm.
- Grasp one end of the tourniquet in each hand and gently lay it flat on the back of the patient’s arm.
Step 3: Tying the Tourniquet
There are two effective methods for tying a tourniquet for blood draw:
Method 1: Tuck and Pull
- Wrap both ends of the tourniquet over the top of the patient’s arm.
- Swap hands holding the tourniquet ends (right hand to left, left hand to right).
- Gently pull both ends upwards towards the patient’s shoulder, creating an “X” shape.
- Take the right end of the tourniquet and fold it back under itself.
- Tuck the folded end under the left end of the tourniquet.
- Pull both ends snug, but not constricting, to create a secure hold. The right end should point towards the patient’s shoulder, and the left end towards their hand.
Method 2: Loop and Cinch
- Similar to Method 1, wrap both ends of the tourniquet over the top of the patient’s arm.
- Ensure the inside end of the tourniquet is slightly longer than the outside end.
- Hold both ends firmly and tighten the tourniquet around the arm, creating two loose ends.
- Rotate the tourniquet slightly and tuck the shorter (outside) end underneath the longer (inside) end, folding it in half.
- Pull both ends to create a secure hold, with one end pointing towards the shoulder and the other towards the hand.
Step 4: Distending the Veins
- Once the tourniquet for blood draw is securely fastened, instruct the patient to gently clench and unclench their fist several times. This action helps to distend the veins, making them more visible for venipuncture.
Step 5: Releasing the Tourniquet
- It’s crucial to avoid leaving the tourniquet for blood draw on for an extended period. The recommended time frame. It’s important to emphasize that tourniquets for blood draw are distinct from those used in emergency situations. Only trained medical professionals should apply tourniquets for severe bleeding control. Here’s a brief overview:
- Emergency Applications: Tourniquets are a life-saving tool in severe bleeding emergencies, such as car accidents, gunshot wounds, or crushed limbs. By restricting blood flow to the injured area, a tourniquet can significantly reduce blood loss and prevent death.
- Improper Use Risks: Improper tourniquet application in emergencies can be detrimental. Leaving a tourniquet on for an extended period (more than two hours) can lead to tissue damage and even amputation. Only trained professionals have the knowledge and skills to assess the situation, apply the tourniquet correctly, and monitor the patient for complications.
Tourniquets in Emergency Bleeding Control
It’s important to emphasize that tourniquets for blood draw are distinct from those used in emergency situations. Only trained medical professionals should apply tourniquets for severe bleeding control. Here’s a brief overview:
- Emergency Applications: Tourniquets are a life-saving tool in severe bleeding emergencies, such as car accidents, gunshot wounds, or crushed limbs. By restricting blood flow to the injured area, a tourniquet can significantly reduce blood loss and prevent death.
- Improper Use Risks: Improper tourniquet application in emergencies can be detrimental. Leaving a tourniquet on for an extended period (more than two hours) can lead to tissue damage and even amputation. Only trained professionals have the knowledge and skills to assess the situation, apply the tourniquet correctly, and monitor the patient for complications.
Considerations for Phlebotomists
- Patient Comfort: Throughout the tourniquet for blood draw application process, prioritize patient comfort. Explain each step clearly and avoid causing unnecessary tightness.
- Alternative Techniques: If a suitable vein is not readily visible after applying the tourniquet and having the patient clench their fist, consider alternative techniques like applying warm compresses or using a tourniquet on the opposite arm for short periods.
- Tourniquet Removal: Once blood collection is complete, promptly remove the tourniquet for blood draw to prevent discomfort and ensure proper blood circulation returns to the arm.
Tourniquet Selection and Care
- Phlebotomy Tourniquets: Phlebotomists typically use single-use, latex-free tourniquets made from comfortable, elastic materials. These disposable tourniquets minimize infection control risks and ensure proper hygiene.
- Improvised Tourniquets: In rare situations where a commercial tourniquet is unavailable, improvisation may be necessary. Ties, belts, or scarves can be used as temporary substitutes. However, prioritize patient safety and only use improvised methods as a last resort.
Building Proficiency in Tourniquet Technique
Mastering proper tourniquet for blood draw application is an essential skill for phlebotomists. Here are some tips for building proficiency:
- Practice on Simulator Arms: Utilize simulated arms specifically designed for phlebotomy practice. These arms allow you to refine your technique in a safe and controlled environment.
- Visualize Success: Before performing a blood draw on a patient, mentally rehearse the steps involved in applying the tourniquet. Visualizing the process can boost your confidence and ensure smooth execution.
- Seek Feedback: During training or clinical rotations, actively seek feedback from instructors or experienced phlebotomists on your tourniquet application technique.
Conclusion: Mastering the Tourniquet for Effective Blood Draws
A properly applied tourniquet for blood draw is a valuable tool in a phlebotomist’s arsenal. By following the steps outlined in this guide and prioritizing patient comfort and safety, you can ensure successful venipuncture and contribute to a positive blood draw experience.
FAQs: Tourniquets in Phlebotomy
How long can I leave a tourniquet on for a blood draw?
A tourniquet should not be left on a patient’s arm for longer than 60 seconds to prevent discomfort and blood flow restriction.
What if I can’t find a suitable vein after applying the tourniquet?
Consider alternative techniques like applying warm compresses or using a tourniquet on the opposite arm for short periods. If unsuccessful, consult a more experienced phlebotomist.
Can I use an improvised tourniquet for a blood draw?
While ties, belts, or scarves can be used as temporary substitutes in rare situations, prioritize using a commercial, single-use tourniquet whenever possible to ensure hygiene and proper technique.
How can I practice applying a tourniquet?
- Utilize simulated arms designed for phlebotomy practice.
- Visualize the process beforehand to boost confidence.
- Seek feedback from instructors or experienced phlebotomists during training.
In addition to expert instruction, you’ll gain valuable hands-on experience through simulated labs and clinical rotations.
Contact Phlebotomy Now School today to learn more about our programs and take the first step towards a fulfilling career in phlebotomy!
Ready to Launch Your Phlebotomy Career?
Phlebotomy Now School offers a comprehensive phlebotomy training program designed to equip you with the knowledge and skills you need to excel in this rewarding field.
Our program covers essential topics like venipuncture techniques, blood collection procedures, and patient care.